Hosted by site sponsor WebMate.
Silver Tower Mac Pro (Dual Optical) Q&A
Update Published August 13, 2021
All Mac Q&As >> Silver Tower Mac Pro Dual Optical Q&A (Home)
To be notified of new Q&As, sign up for EveryMac.com's bimonthly email list.
How do you upgrade the hard drives in the Mac Pro? How many drives of what type are supported?
This Q&A explains how to upgrade the storage in the tower Mac Pro models with two optical drives shipped from 2006 until 2013 (model numbers A1186 and A1289). These models should not be confused with later tower Mac Pro models, which do not have an optical drive, and EveryMac.com covers separately.
Upgrading the hard drives in all Mac Pro models is simple, but some basic instructions are helpful nevertheless. Apple does formally support individuals upgrading the hard drives themselves, too.
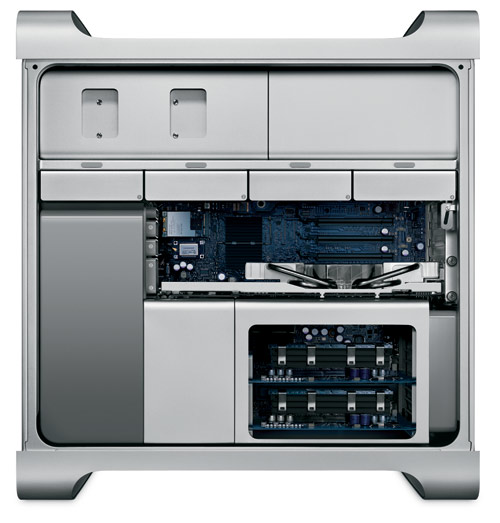
Photo Credit: Apple, Inc. (Original Mac Pro)
Identification Help
For the purpose of upgrading the hard drive or hard drives in the Mac Pro models, they are similar enough that one almost not need know the differences. However, the process is slightly different for earlier A1186 and later A1289 Model Number Mac Pro models and it still is a good idea generally to know which Mac Pro one owns.
All Mac Pro lines can be identified to some extent by the Model Identifier in software. To locate the model identifier, select "About This Mac" under the Apple Menu on your computer and click the "More Info..." button. If the Mac Pro is running OS X "Lion" (10.7) or later, click the "System Report" button after clicking "More Info..." as well.
Externally, the Mac Pro lines can be uniquely identified by EMC Number. The EMC number is listed on the rear of the system in small type.
Useful identifiers for the Mac Pro lines include:
Mac Pro Subfamily |
Model Number |
Model ID |
EMC Number |
Original (2006) |
|||
Original (2007) |
|||
Early 2008 |
|||
Early 2009 |
|||
Mid-2010 |
|||
Mid-2012 |
More details about specific identifiers are provided in EveryMac.com's extensive Mac Identification section.
EveryMac.com's Ultimate Mac Lookup feature also can identify these systems by their Serial Numbers.
Supported Hard Drive Types & Options
All Mac Pro models have "four independent 3 Gb/s Serial ATA cable-free, direct attach hard drive bays" with "four internal hard drive carriers included", and precisely the storage must meet these specifications:
- Type: SATA 3 Gbps
- Width: 3.9 inches (102 mm)
- Depth: 5.7 inches (147 mm)
- Height: 1.0 inch
By default, a single 3 Gb/s Serial ATA -- sometimes referred to as SATA 2.0 or SATA II -- hard drive is installed in the first of four bays for all models.
The original Mac Pro models formally support a total capacity of 2 TB (four 500 GB drives), the "Early 2008" models up to 4 TB (four 1 TB drives), and the "Early 2009," "Mid-2010" and "Mid-2012" models up to 8 TB (four 2 TB drives), although EveryMac.com readers have reported that larger hard drives work without issue in all models.
1.5 Gb/s Serial ATA hard drives also will work in all Mac Pro models, albeit at reduced speed. Of course, four SSDs -- or a combination of up to four hard drives and SSDs -- also can be easily installed in these drive bays with the right adapters.
Unofficially, all Mac Pro models also can accommodate a fifth (and even a sixth, depending on physical size) hard drive or SSD by using the second 5.25" optical drive bay. Site sponsor Other World Computing offers a selection of Multi-Mount kits that make adding these extra drives easy. You may also be interested in additional options for this second 5.25" optical drive bay.
Hard Drive Upgrade Instructions
Apple provides a PDF that covers upgrading the hard drives in the Mac Pro -- and covers the same material in the instruction manuals for each model as well -- but even better, Other World Computing provides step-by-step videos of the process.
Mac Pro Hard Drive Upgrade Video
Original (2006 & 2007)
& Early 2008 (A1186)
Mac Pro Hard Drive Upgrade Video
Early 2009 (MacPro4,1)
Mac Pro Hard Drive Upgrade Video
Mid-2010 & Mid-2012 (MacPro5,1)
After watching these videos, it should be clear that upgrading the storage in the Mac Pro models is simple. However, if you do not feel comfortable -- or have the time -- to perform the upgrade yourself, hiring a professional always is a good idea.
Mac Pro Hard Drive Purchase & Professional Installation Options
In theory, just about any hard drive or SSD that meets the minimum requirements should work in the Mac Pro. However, it always is best to buy from a trusted company with Mac knowledge for the most trouble-free experience.
In the US (and many other countries), site sponsor Other World Computing sells hard drives and SSDs compatible with all Mac Pro models, as well as the previously mentioned Multi-Mount kits that make it easy to install hard drives or SSDs in the Mac Pro optical drive bays.
In the UK and Ireland, site sponsor Flexx sells Mac Pro compatible SSDs with free shipping. The company provides flat rate shipping to France, Germany, and Switzerland and inexpensive shipping for all of Europe, too.
Also see:
- How do you upgrade the hard drives in the Mac Pro to SSDs? What SSD options are available? Which SSD configuration provides the fastest performance?
- How do you install a second optical drive or replace the primary one in the Mac Pro models? What options are available for the second Mac Pro "optical drive bay"?
- How many PCI slots of what type are provided by the Mac Pro models? How do you install a PCIe card in the Mac Pro?
Permalink | Report an Error/Typo | Sign Up for Site Update Notices
<< Mac Pro Dual Optical Drives Q&A (Main) | All Mac Q&As
Established in 1996, EveryMac.com has been created by experts with decades of experience with Apple hardware. EveryMac.com includes, and always has included, original research incorporating detailed, hands-on inspection of packaging, computers, and devices as well as extensive real-world use. All information is provided in good faith, but no website or person is perfect. Accordingly, EveryMac.com is provided "as is" without warranty of any kind whatsoever. EveryMac.com, and the authors thereof, shall not be held responsible or liable, under any circumstances, for any damages resulting from the use or inability to use the information within. For complete disclaimer and copyright information please read and understand the Terms of Use and the Privacy Policy before using EveryMac.com. Copying, scraping, or use of any content without expressed permission is not allowed, although links to any page are welcomed and appreciated.